http://www.youtube.com/watch?v=H_l5vRVUoyU&feature=player_profilepage
http://www.youtube.com/watch?v=wK8nHn095I8&feature=player_detailpage
and this one compliments of Chris O in NSW
http://s996.photobucket.com/albums/af83/1931sal/Anniversary%20Meet%20Flint%20MI%20July%202011/?action=view¤t=IMG_8193Medium.jpg

Thursday, July 28, 2011
Sunday, July 24, 2011
Could These Be The Workers That Made My 1928 Chev
The following video is of the Holden Body Builder's South Australian factory in 1925. As my Chev was produced in the same factory just 3 years later, it would be a fair comment to make that we are looking at some of the workers and machines that produced my 1928 Chev National Tourer.
Enjoy this view into the past, 86 years ago, different times, different values and a generation of workers that has long since passed on.
Tuesday, July 19, 2011
More on Rust Buster
Before and after photos, and if you would like to know more, see my earlier posting titled " My Reccomended Rust Converter"
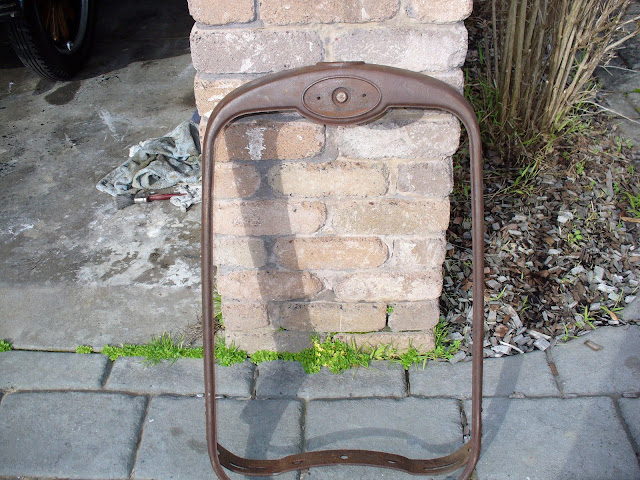

What a shame someone in the Black Hills of Dakota used this for Target practise, but its a spare and can be repaired to make an excellent chrome surround.


24 hours soaking in Rust Buster


What a shame someone in the Black Hills of Dakota used this for Target practise, but its a spare and can be repaired to make an excellent chrome surround.


24 hours soaking in Rust Buster

Monday, July 18, 2011
Bonnet Side Restoration ( A bit out of sequence but worth mentioning)
Back in 2009, just before the Castlemaine Chev 4 tour, I noticed both sides of the bonnet were looking a bit sad, due to rust damage coming from the bottom rolled edge of the sides.The problem had been long standing, and sadly neglected for a few years before I decided to fix the problem. The rust was bubbling the paint work from the bottom rolled edge upwards.
I discovered that the bottom rolled edge of the bonnet sides were both full of dirt, and retaining moisture.I followed the following process with complete success so far (2 years later)
1. Using a steel rod I ensured the inside of the rolled edge was cleaned of all dirt and obstruction.
2. The lower edge of the bonnet sides were treated with rust converter.
3. A suitable sized steel rod was inserted into the full length of the bottom rolled edge.This served 2 purposes, the first and most important, the inside of the rolled edge was permanently sealed against dirt and moisture, and the second being the bonnet sides were now a bit more rigid.
4. The bonnet was then sprayed with primer and several coats of top colour.
With the bonnet sides a bit more "stiffer" there is no longer a "crack" or small cap in the paint where the return of the rolled edge meets the flat surface of the bonnet side.
Hopefully this experience may help others and here are a few photos of the process.
This is my home made soaking tank, consisting of a couple of old towells under a sheet of heavy plastic, turned up on the sides and supported by a few 4 x 4 timbers and a few house bricks. Oh, and of course 6 litres of Rust Buster, than can be re-used time and time again.

About to fit the rod into the rolled edge

The finished article. Good for another 80 years?

Sunday, July 17, 2011
A Days Therapy at A Gippsland Health Farm, Hell No.
A list of jobs had been planned for a couple of weeks and kept the pair of us, and Bella the dog busy for about 9 hours.
Monty is slowly coming back to life, in what I call baby steps, bit by bit, and today's program included the following:

Now where does this go again?
We removed the two rear axles, then the inner axle seals were extracted. Grant was in his element, cleaning out the axle housings and diff of thick brown sticky oil. Yuk.
The old axle bearings were removed and new ones pressed back on.
New inner axle seals were fitted, in went the axles, new gaskets, felt pads and everything was bolted back together again.
After a BBQ lunch of steak and chips, served in the outdoor dining area, Bella the dog summoned us both back to work. In went the new hand brake inner band, on went the wheel to test, and what do you know, for the first time in about 42 years Monty had something resembling a working brake. Spurred on by our success we then tackled the outer brake bands, the foot brake, and we were in luck again. Monty now had full braking on two of his 4 wheels. After we adjusted the rear brake linkages and a bit more tweaking, the rear brakes were considered as done, bolted up nice and tight.
Here's yours truly pretending to know what he is doing, but more importantly admiring the new brake linings, thanks to Kevin of Dapto.
What about this one Grant, where does it go?

One more battle was planned for the day, the front brake shoes. Wheel bearings were removed, cleaned, repacked with new grease and fitted with new felt seals.
Monty was back on all fours, and a fine rolling chassis he is.
9 hours was spent in the shed and time just flew. We both worked constantly, four hands making easy work out of jobs that are usually very tricky.
We were happy that we completed all we set out to do and as usual here is Monty reviewing the days work, and giving Grant another list of jobs to complete before the next working bee in a few weeks time...

Grant plans to tow Monty over to his sign shop this week to prepare the chassis for painting on the weekend, and says he needs to heat the shed with a wood fire and a big gas heater for a better job on these cold days....
Damn Monty, what an old softy.
PS. I know one thing for sure, its so much easier to install and work on brakes, when you don't have a car body to deal with and get in your way.
Friday, July 8, 2011
Happy to Help if I Can. Just ask
One of the benefits of restoring and maintaining the same car for 38 years is the experience you gain along the way.
The good times, the dramas and the odd failure or two helped me to learn as I went.
If my experiences can help others in the restoration or maintenance of their Chev 4 its a bonus.
I learned about Chev 4's the hard way. There were not many people on the ground to ask back in 1973. No chat sites, no Internet, no Chev parts dealers on the other end of an email and especially no eBay where so many parts are now available.
If I was a novice restoring a Chev 4 now, the amount of information and parts available compared to back in 1973 is amazing.
By no means would I call myself an expert, far from it and I am still learning, even after 38 years.
But there are one or two things I have picked up along the way, and I am happy to share this with others.
If I cant answer your question, I will try to put you in contact with others that can.
There are also many web sites that can be passed on to new comers.
And if it helps keep a few more old Chev's on the road, then that's good enough for me.
We may be a bit crazy to play with 82 year old cars, we may have a passion to work with rusty panels that were scrapped 40 years ago, and we may be driven or some may say possessed to reclaim and salvage a part that is way beyond being regarded as serviceable, but more importantly we are not alone.
Happy vintage motoring thrill seekers.
Ray Dean
Thursday, July 7, 2011
Chev 4 Carter Carby Specifications
For any one wanting to know specs and parts lists for Chev 4 Carbys, I have attached a few relevant pages. I hope this may help someone.
For Engine tuning
http://old-carburetors.com/Chevy/pages/024-Chevy.htm
Exploded view
http://old-carburetors.com/Chevy/pages/025-Chevy.htm
Original Parts lists
http://old-carburetors.com/Chevy/pages/026-Chevy.htm
Specs
http://old-carburetors.com/Chevy/pages/027-Chevy.htm
The Carby Doctor (Kits)
http://www.carbkitsource.com/carbs/catalog/Chevrolet/index.html
Classic Chev Carby (Kits)
http://www.carburetion.com/Kits/chevy.htm
The Filling Station (Kits & Spares)
http://www.fillingstation.com/catalog.htm
Saturday, July 2, 2011

Subscribe to:
Posts (Atom)