I have been wanting to do this posting for sometime, and I was able to gather the information today (16th June) from the owners, Bev and Irwin Sinclair.
Irwin is the president of the Dandenong Valley Historic Car Club
http://www.dvhcc.com.au/ and a founding / life member of the Cadillac Lasalle club of Australia. The V16 has been in the Sinclair's possession since the 90's.
The Car:
A 1938 Cadillac Series 90 V16 Convertible Coupe
The History Behind the 1938 Series 90 V16
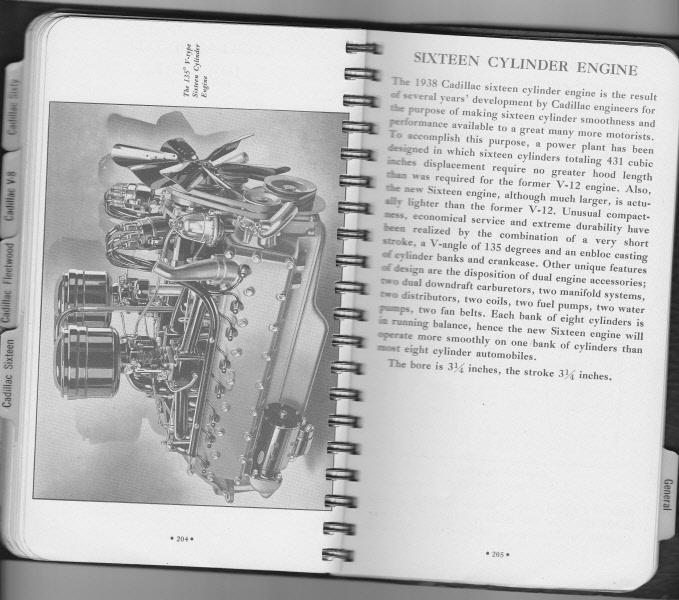
The 1938 Cadillac models solidified GM’s position at the forefront of automotive design. The all-new V16 was now more like a twin eight in its basic design, and along with greater power output, it was more reliable and easier to service.
The 1938, Cadillac was one of the few luxury cars remaining in production in America. Despite the disappearance of many of Cadillac’s competitors, the marque survived while its longstanding competitors, including Pierce-Arrow, Duesenberg, Marmon, Stutz and Franklin, slowly disappeared. The Series 38-90 V16 was the proud company’s pinnacle of engineering and design achievement. The Fleetwood bodied Convertible Coupe epitomizes the triumphant Cadillac V16 of the era with its beautifully flowing lines and contours, while the smooth 16-cylinder engine provides an abundance of power and torque.
The 1938 Cadillac V16 clearly demonstrates that a high volume automobile manufacturer, in this case GM, could produce a low volume prestigious vehicle that would hold its own against any comparable vehicle of the day. Having recently helped another DVHCC member (Les Francis) with his 1938 Lasalle, which shares many Cadillac components, I was impressed with the standard of engineering and "strength" built into the finished product.
Here is an example of the model
 Specification:
Series 38-90. 185 hp, 431 cu. in. L-head V16 engine, dual Carter carburetors, three-speed selective manual transmission, syncromesh on 2nd and 3rd gear, independent front suspension with coil springs, semi-floating rear axle, and four-wheel hydraulic drum brakes. Wheelbase: 141" Left Hand Drive.
Here is an example of the V16 motor

Irwin's car is body number 3 of only 10 produced by Fleetwood USA
Body no 1 was for Gary Cooper
Lets start this cars journey from the present day and go back
Part 1 - Current Status (16th June 2012)
Irwin reactivated the project this year and after several weeks and assistance from DVHCC member Lindsay Tharle has the body to the stage where Irwin is hoping to have in it primer coat by Christmas. The following photos were taken today and show a body very close to being ready for a coat of paint.
Update 23rd June -
Repaired rear corner. (by Irwin) replaced metal section.
Update 23rd June -
Rear corner after being lead wiped by Lindsay. What an improvement!
Update - 23rd June. Very pleased with the
gap after lead was put in side of edge.
Update 23rd June - Other rear corner after the same lead treatment.
Update 23rd June - Off with the door.
1. Only Irwin would know how many hours of work have gone into this rear end.
2. No rust in here, only good metal.
3. On this model, no provision was made for right hand drive.
4. Even in primer the lines of the body look very smart
5. How far would you need to park from other cars to avoid making door contact?
6.
7. Showing repaired lower section with primer guide coat applied.
8.
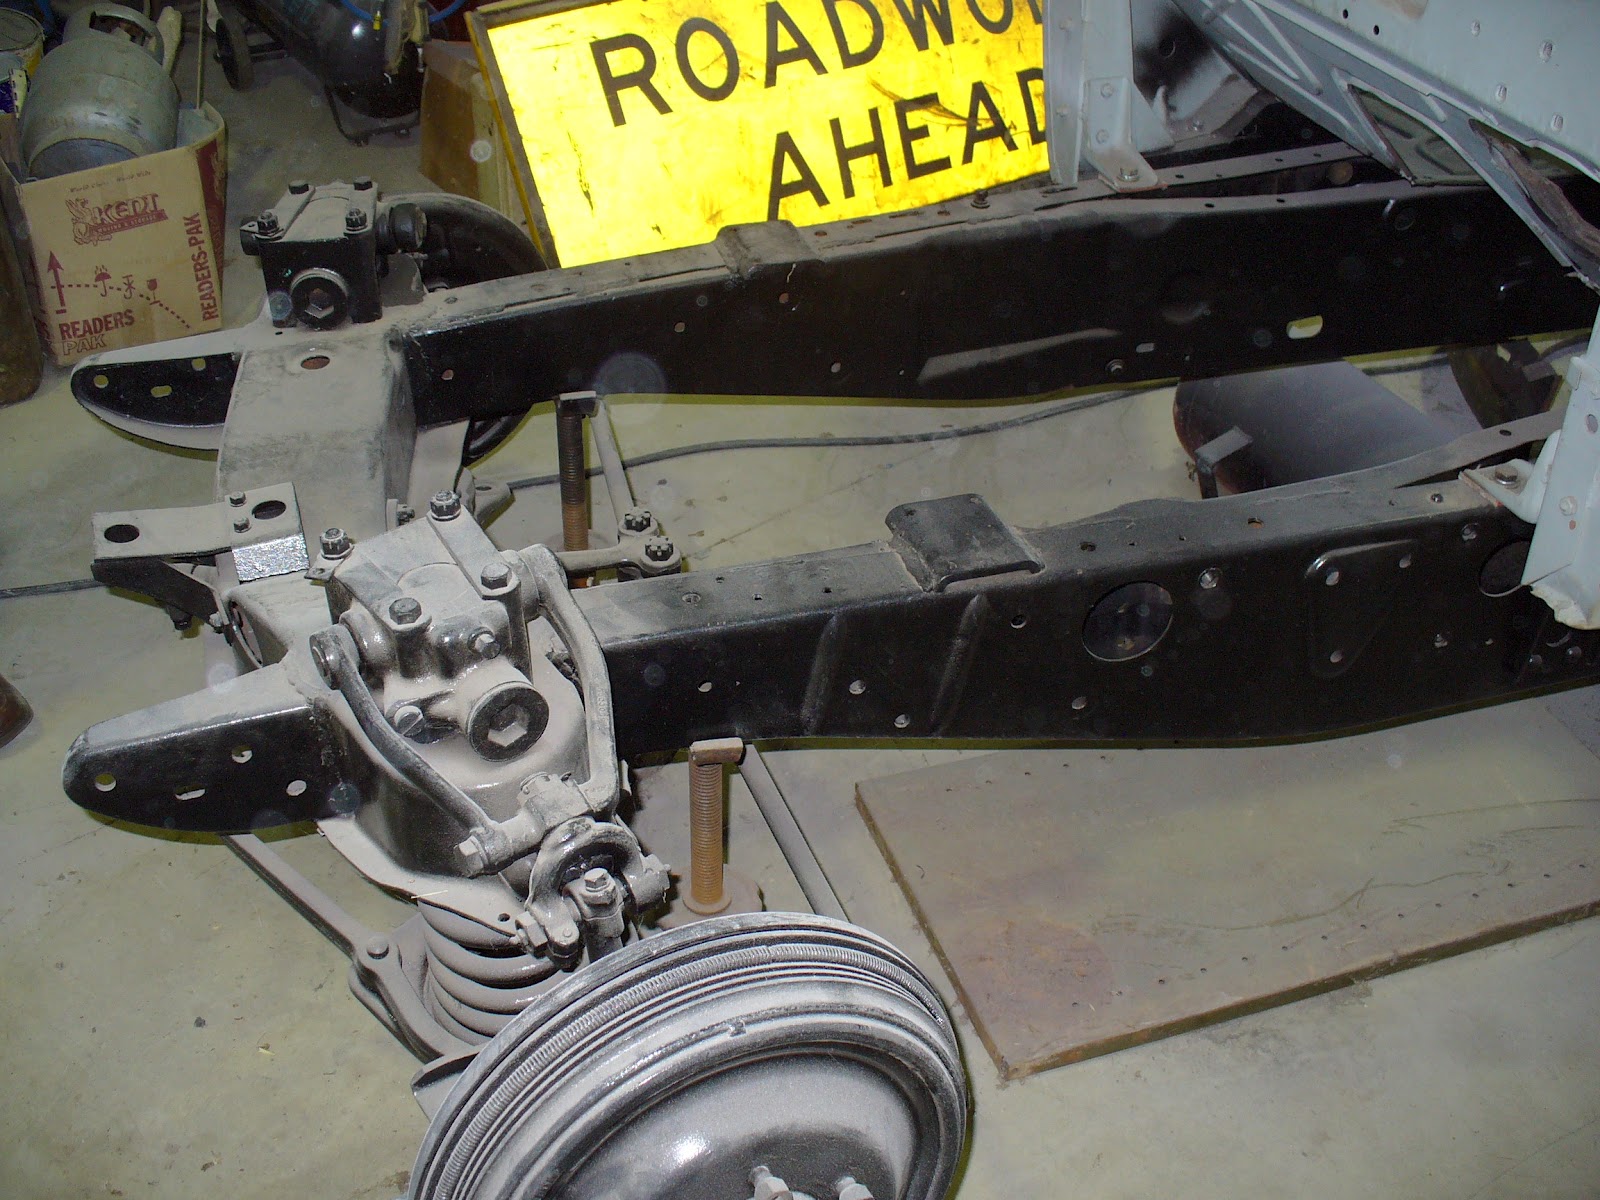
9. Take a look at the size of the chassis that has perimeter and centre X frame and heavy steel plate 1/4" thick on the X frame.
10.
11.
12. You can see how much the door has been extended from standard.
13. Hidden under that dust is a very robust front end
14. V16 cars had finned brake drums.
15. This is where the transmission fits between the chassis rails.
16. Note the X frame in the chassis and the heavy steel plate on the top and bottom of the X frame.
17. This is an example of the rust areas that Irwin cut out and replaced with new metal on both sides.
18. Count the plugs, 8, and that's only half.
19. Seeing double. Two fuel pumps, two distributors and 2 water pumps. The Right Hand distributor has 2 sets of points, one for the left hand coil and one for the right hand side coil.
20. Irwin is not sure if the engine has been rebuilt or original, but suspects it to be original. He was told by the seller that the motor was good. Consultation and subsequent inspection by a friend in the States gave the opinion that it
appeared to be a good motor when he ran it for the previous owner.
When the car arrived in OZ, Irwin started and ran it for quite a while with a mechanic friend who gave the same opinion that it appears to be
in good running condition.
Irwin hopes to have the engine back in the car around Christmas or shortly there after. All that is required then is a new set HT
leads.
21. Give or take an inch, but from the end of the gearbox to the front engine pulley is 80 inches.
Part 2 - The work done by Irwin to get the Caddy to where it is now 16th June 2012
22. The body taken off the chassis
23.
24. The floor pan had many small pin holes and larger rust holes, that were all repaired by welding.
25. Some of the rust areas that Irwin removed and replaced.
26.
27. Inside the rear quarter panel between the front door and rear wheel well.
28.
29. You can see in this picture a piece of metal that has been replaced
30. Bracing was put into the body to prevent any distortion during the rust repair process.
31. A less motivated person may have been scared off the project faced with rust repairs such as this
32. Lower outer body skin.
33.
34. The timber body rails that sit on the chassis required full replacement.
35. The laminated timber rails were remade to original specifications. Old and new side by side.
36.
37.
38.

39.

40. The vertical side rail timbers on both sides were all replaced.
41. More unwanted ventilation
42. Note the absbestos between the body and timber rail, which allowed the floor to be welded in place on top of the timber as part of the manufacturing process.
43.
44. Front Right Hand Side skuttle after the timber was removed.
45. Right Hand Side, between the front door and rear wheel arch. Note the holes on the bottom to nail the metal body to the timber rails. Irwin used the same process after repairing the area.
46. Right Hand Side sill panel. Both sides were replaced with newly made panels.
47. The first stage of repairing the areas on both rear corners of the tub, marking out the piece to be removed. Irwin told us that the double panel construction was the main cause of rusting.
48.
49. Underneath rear where bumper iron goes through the body. (inside view)
50. Inner panel behind outside panel. All were replaced with new metal. (cant get much worse than this)
51.
52.
53.
54. This area is prone to rust due to moisture and dust getting between both panels.
55. You can see the rust has eaten through both panels
56.
57. The inner panel section welded in place

58. New inner panel welded in place.

59.After grinding and finishing off the area looks like new.

60. The other side.

61. Chassis painted and in place ready for the body to be fitted.
62. Ready to lift.

63. Going up.
64.
65.
66 New sill panels were fitted to both sides.
.
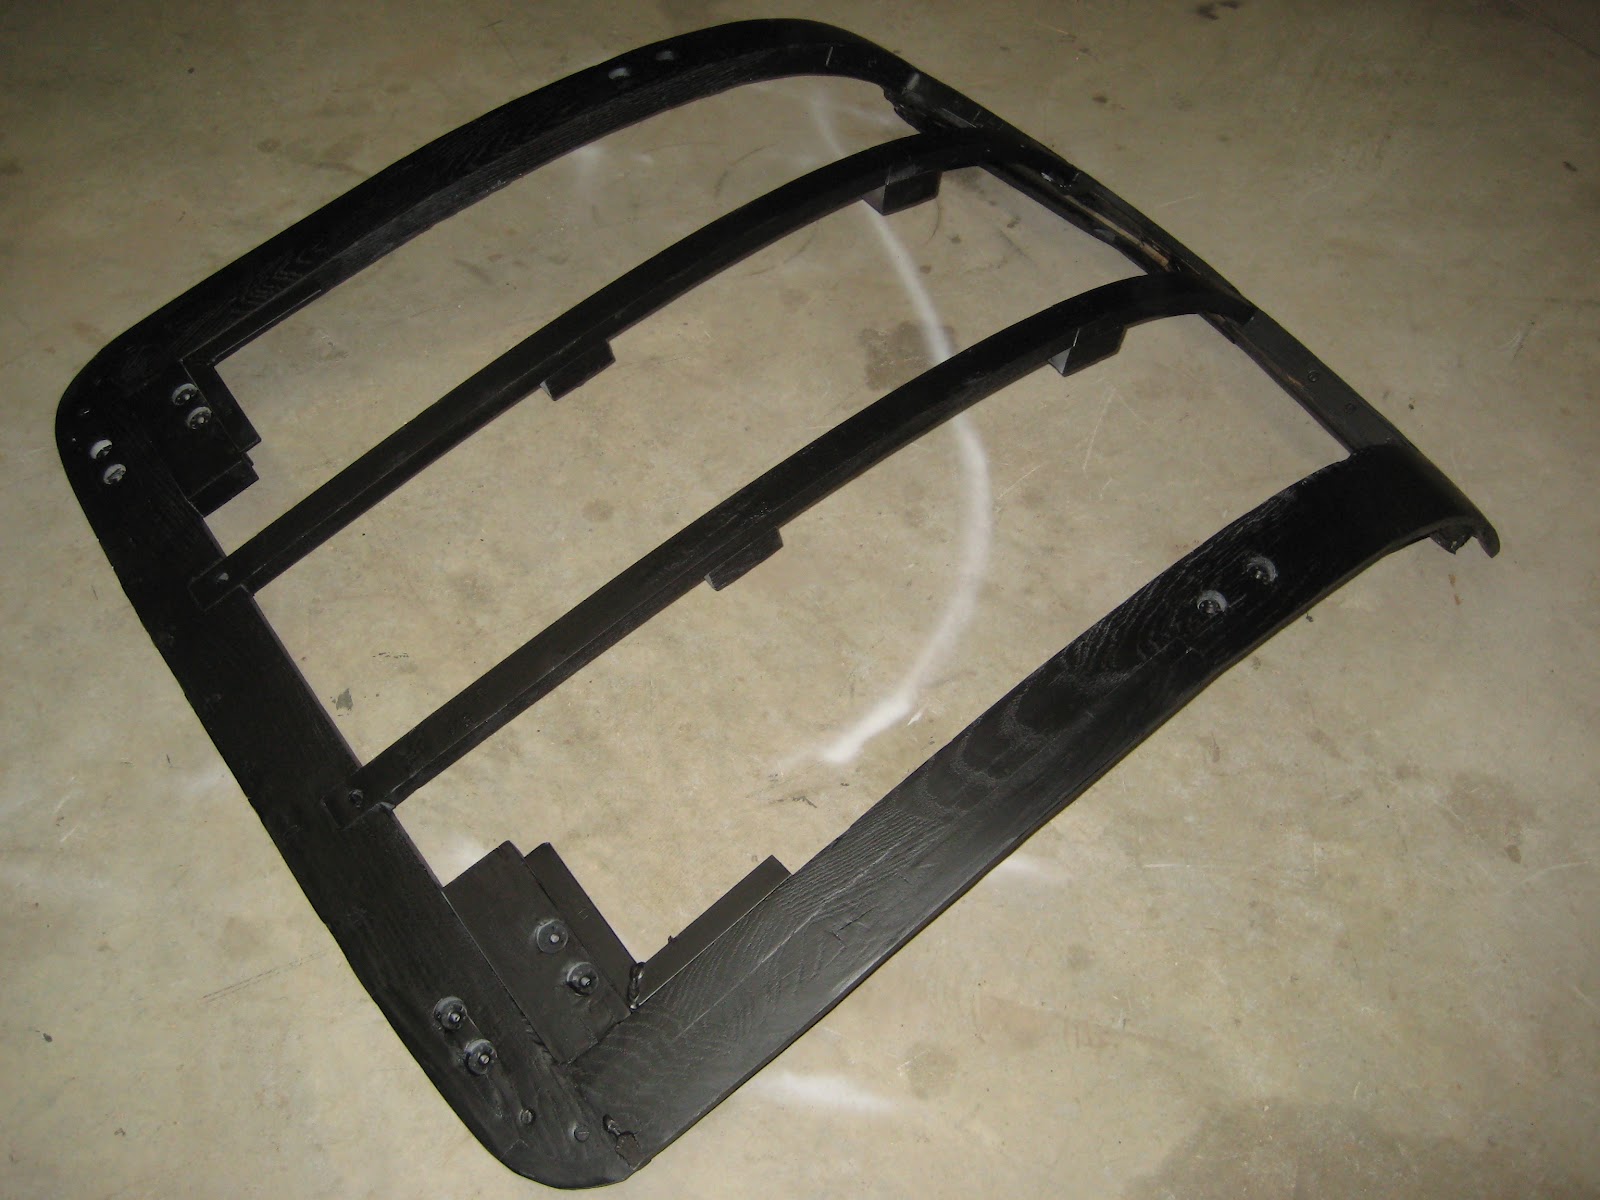
67. Laminated wooden timber frame.
68 Area above the rear differential.
.
69. Inside the rear boot
70. Starting to look like a complete body again
71.
72.
73.
74 Forming a replacement panel, with just a bench, block of wood and a couple of G clamps, using the original timber for a pattern.
75. The sills were spot welded as originally fitted.
76. A replacement rear quarter panel section timber before welding in the new metal section.
77.
78. A very nice looking under body
79.
80. Forming a replacement panel, with just a bench, block of wood and a couple of G clamps.
81.
82. Some timbers from the rear boot lid (deck lid) were able to be reclaimed by replacing a section.
83. Oversized timber was spliced into place using special water resistant glue.
84. Excess timber was removed to take the piece back to the original size.
85.
86.
87.
88. A complete new wooden frame for the boot (OZ), or the trunk (USA)
89.
90.
91.
92.
93.
94. Quietly waiting for the day when it will rejoin the chassis
 Part 3 - The Early Days
95. This is the Caddy in storage as Irwin first saw and purchased it.
96.
97. Original trim removed. (Was Bedford cord) Note the two jump seats for rear passengers if required.
98.
99.
100.
101. The front guards were off the car and were fitted before it was shipped.
102.
103. An improvised lock on the trunk for the trip to OZ.
104. Out of storage ready to be trucked from San Francisco to Long Beach LA.
105.
106.
107. My first OZ sighting after customs checked and released the car.
108.
109. The car chassis and overall length is the same as the 7 passenger limosine, but with just 2 doors.
110. Loaded onto the flat top, next stop, home.
111.
112. Lets just keep an eye out to make sure it does not get lost.
113. Being unloaded in Cranbourne 22nd November 1995
114.
115.
116. The eagle has landed.
117. Safely tucked away in the shed
118.
119.
120.
121.
122. The Caddy was invited to a display at a Victorian winery
123.
124.
125. At the panel shop of Perry Becker in Fern Tree Gully. Perry repaired the skuttle, both front guards, front wheel wells, rear guards, bonnet and made the 2 replacement sills that I fitted.
126.
127. Cant see all that hidden rust repaired here
128.
129.
130. Left hand distributor has no points, HT rotor only.
131. Sitting in the panel shop less the chassis.
Stay Tuned Folks, the Best is Still to Come.
Regards
Irwin Sinclair