
Before the latest posting, the story so far is
http://my28chev.blogspot.com.au/2014/06/gatsby-1928-chev-from-blacktown-sydney.html
Now for the update as at 4th April 2015
June 2014
Ok Still doing the
trim, found out that I was missing the piece of wood that goes most away around
the back, my first thought was that I don’t need it…. but then when I sat the
back rear seat in, I noticed it was sitting up higher, about the size of the
timber that should have been there, so I got a length of Tassy oak and started
to trace and cut it to the shape of the car. It was a lot of hard work for my
jigsaw, but I had to do with what I had. I used a piece of 32x60mm and cut the
60 down to 40mm to fit the shape. cut and shape, cut and shape…..oh and the
flapper disc helped heaps around the corners of the wood.

It is a shame that the
car has some nice wood in it, yet most of it will all be covered.. well I have
an idea on that.. stay tuned.
As for the seats I got
hold of some brand new padding that was to be used to line elevators during
service, cut it to shape and covered each seat as a backing over the springs
first, this was done with hog ties… the padding looked like it was made from
like a horses hair with scotch guarded cotton drill on each side ..

The car also came with
a sun visor, but no glass in it ( I am told it was to have a green glass with
circle patterns in it) I went to an acrylic/Perspex place and got a new smoke
tinted piece cut for $35

July 2014
Windscreen arrived ,
when going to take the screws out for the top frame sides, I found that they
were rusted in, Getting the arms of the side window frame un done was
impossible, I guessing they haven’t been
undone in 90 years? So I had to drill them out and re tap the thread, another
new thing I learnt. I put the rubber around the glass some sealant in the
frame, then put the glass and rubber into the frame, I strapped it up around
the sides over night.


Ok most the trim
finished, but I am not happy with my sewing on the door pocket flaps, so I may
have to re do them, the rest of the car came up better than I expected for an
armature’s first and second last go.
With the door trims, I
sewed a square 4cm in around, my theory there was that I had somewhere to tack
the nails to the wood, however knowing I would have to take them off again to
re-do the pockets, I ditched the nail idea and I bought some small plastic Christmas
tree clips and drilled a 10mm deep hole near the corners to hold them. yeah ok
I know its not the original way to do it, but no one will ever see, they sit
tight and I can get them off again with ease.
Mmm What is this…..oh
well … 
Not even finished yet
and I was able to pick up my first bit of pussy in it today, at least he likes
the soft seat ..(covered in a picnic rug to protect the leather from him)
Door boards were cut
out of a redicoat Masonite, it’s a masonite that has a semi waterproof white
coating on one side. I cut them to shape
then sat them in the car with the seats in before drawing the pocket hole, this
way I was assured the flaps would open in the car while the doors are closed.
The doors also got the thin layer of foam under the leather. (white side on the
other side )


Then it was a matter
of following the Blue chalk line a drew on, sewing the leather to the foam.
Now for the wood idea… As I said earlier I was
unhappy that the car has so much wood in it, yet I have just covered it all
up!, firstly I wasn’t sure if I was going to have enough leather for
everything, so my first thought was to put thin wood behind the front seat. My
second thought was to put a wood trim around the back and back sides, after all
leather and wood go sweet together. And this is the result, again the purist
will hate it, and probably hate me for doing it

The difference of
color is one is with the flash on and one without…

Well… What do you
think???
August 2014
Windscreen ready to go
in, when putting it in a had a hint from a club member to make sure that the
posts are pulled back tight before tightening them, as later if I was to get a
canopy measured up, it would help prevent it from moving and sagging, so I put
a couple of straps on it pulled it firm before tightening the bolts.


Ok windscreen in, Trim
done, Brand new mirror $15, Brand new Wiper $25(filling Station)
The next thing I had
to do was to get it ready for registration.. I am choosing to start of with Club Registration.
I laid under the car for hours checking every bolt and putting in what felt
like 100 new split pins. A couple of new grease nipples, finish of the wiring
adjusting the brake light switch… ect.
Wiring… after I
cleaned the headlights and put the 6v H3 halogens’ in… I went to solder the old
wiring to the light socket and to my surprise the heat of the soldering iron
started to flame down the original cloth wiring.. so I quickly decided not to
use the original wiring harness and opted for black trailer wire instead. This
was neat , and also gives me spare wires if I decide to ad Blinkers later on.
Tires….these all have
good or new tread , however some are starting to show slight cracks on the
sides, I am not sure which are the best or newest tires, I bought 2 brand new
tyres and will wait until I drive it around for a day and see which of the
tires I got with the car start to crack and replace them.
Horn…. the horn with
the car has no cover over the back, (still need to get one) and instead of
sounding like the old Aaarrrhoooogah .. it sounds more like a sick duck!
…Quack. But it works and should pass for Registration, I had to get a new horn button
but got an old brass tap block off fitting and made that to fit for now, I also
had to soak down the center of the steering column for a few days with wd40 and
hammer a steel BBQ squire down the center to get all the foreign particles out,
probably the old wire, but finally was able to thread a new wire down with
ease.
Body Number… I had to
stamp the engine number on the body, I could get a pack of number stamps for
$22 but letter stamps were about $70 and I only needed 1 letter once.. luckily
a truck place next to my work had the stamps and I didn’t had to buy any.. Stamped and done.
Attempt
one….I live on a hill and
while adjusting and testing the brakes at home, I was unhappy when I went off down the hill.. so back home again and adjust all the brakes to perfection..
Attempt Two…. Of we go.. 1/2 way
there and it stops, I check and there was no petrol in the vacuum tank.. my
first thought was the vacuum tank wasn’t working (remember I have only driven
to the letter box and back before) but then the good news the petrol tank was
empty, this was good news as I now Know that the vacuum tank was working fine
and has sucked up the 10 liters I had put in the back months ago while running
it. luckily a petrol station just behind me

Attempt
three… Stopped ….blocked
carby, well I guess this is what happens when you let the tank run dry on a 86
year old car, so I cleaned out the carby , re adjusted the float.. and I guess
I need to install a fuel filte
I must say its starting to look good though
even when stopped on the side of the road.


Attempt four… made it the 3 kms to the motor mechanic and guess what! it passed , first go..
After I got home and check a few things I
notice that the radiator was near empty, it was leaking out of the front of the
water pump, while trying to tighten the big brass nut at the front I noticed
after a turn it got looser, damn thing was threaded..
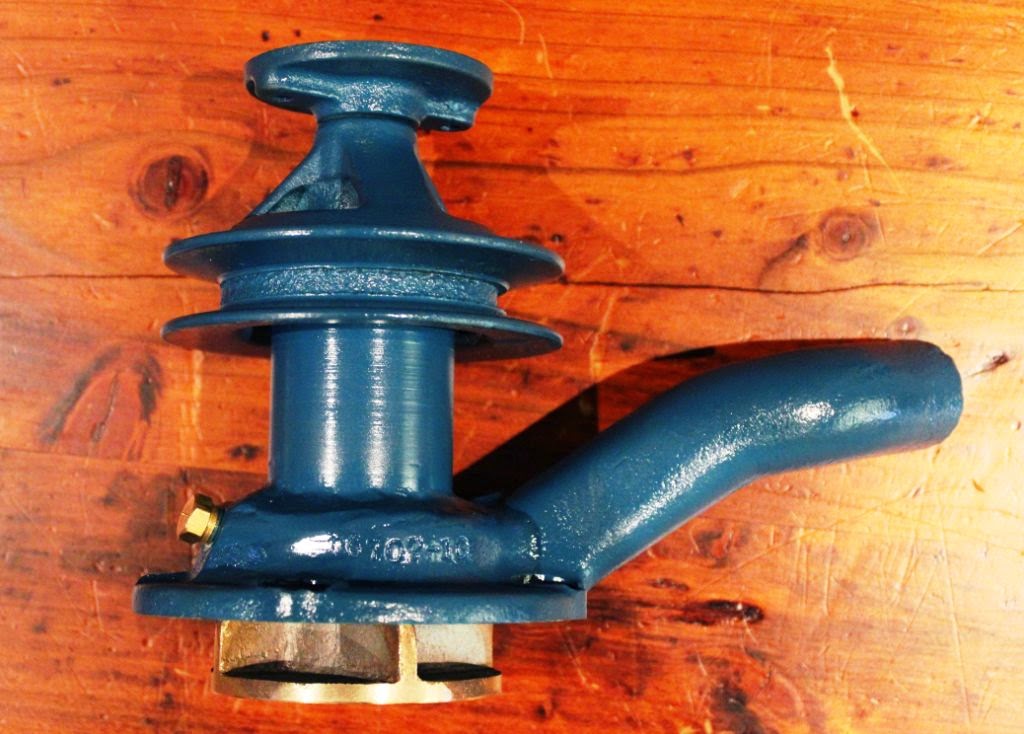
I
remember reading about a recondition water pump on this, Ray’s the red chev’s
web site “My 1928 Chev” I was able to get the guys number (thanks Ray). I rang
him on a Wednesday we agreed to send each other a pump, my old and he had one
ready already reconditioned to send me.. and on Friday he was true to his word
as I had a pump at my front door, reconditioned , with new bearings at the top
and new bearings at the bottom for only $215.
I gave it a quick engine enamel paint and had it on Friday pm.
Next step
is insurance, paperwork, and then the RTA
Ok all
registered, and I am very happy with the plates I got too..(has 28 in the
middle)
The week
before going to the mountains I heard there may be rain coming, eager to go on
this run I pulled out the sewing machine again and sewed up a touneau cover
thingy for the back out of some waterproof leather I had. luckily we only got
about 5 minutes of heavy rain, but it did its job anyway


Below a picture
when from when I took it up the mountains. Runs good smooth quite and doesn’t
overheat.. couldn’t be happier with it

Well
that’s my build from find to now.. hope you enjoyed it and see our You Tube video below.
The story of “Gatsby” from Danny & Sharon.
No comments:
Post a Comment